

Wrist hinge is the controlled cocking of your wrists during the backswing that stores power and sets up a clean, crisp strike at impact. Done correctly, it helps you compress the ball and generate distance without extra effort. The key is learning to hinge naturally around chest height on the way back, maintain that angle through the downswing, and then rehinge through your follow-through to keep the clubface square.
Most golfers we see on the course struggle with one of two extremes: either they never create enough hinge and lose all that potential power, or they overdo it with too much lead wrist flexion and end up hooking everything left. Both problems are fixable once you understand the simple mechanics behind this move.
Here’s what makes wrist hinge so important. When you hinge your wrists properly, you’re setting the club on the right plane and creating a lever that multiplies your swing speed. Think of it like cocking a hammer before you strike a nail. Without that hinge, you’re pushing the club through impact instead of releasing it, which costs you yards and consistency.
The good news? You don’t need to be a scratch golfer or spend hours on the range to get this right. With a clear understanding of the positions and a few simple checkpoints, you can start building a reliable wrist hinge that works for your game. Whether you’re working on your swing during a quick practice session or fine-tuning your mechanics before your next round with friends, mastering this fundamental will pay dividends across every club in your bag.
Understanding Wrist Hinge and What You Need to Practice It
Wrist hinge is the horizontal cocking motion your wrists make during the golf swing, and it’s one of the most important movements for generating clubhead speed and controlling where your ball goes. When you hinge your wrists properly, you’re creating an angle between the club shaft and your lead forearm that stores energy during the backswing and releases it through impact. Think of it like cocking a hammer before you strike a nail, the hinge creates potential power that translates into distance and consistency.
The magic happens because this horizontal cocking motion directly affects your clubface position throughout the swing. When your wrists cock correctly, they help you maintain control over whether the clubface points toward your target or veers off line. Getting this right means the difference between straight shots and those frustrating hooks that curve wildly left.
Here’s the good news: you don’t need fancy equipment to work on wrist hinge. The essentials are simple and you probably already have most of them:
- Any golf club from your bag (a 7-iron works well for practice)
- A full-length mirror or smartphone with video recording capability
- An open practice area where you can make full swings safely
- An alignment stick or spare club shaft (optional but helpful for reference)
- A way to get feedback, either recording yourself or working with a practice partner
The beauty of practicing wrist hinge is that you can start with slow-motion swings right in your home or at Cornerstone’s practice facilities. You’re training a feel as much as a position, so the initial work doesn’t even require hitting balls. Once you understand the horizontal nature of the wrist cock and can see how it positions the clubface, you’ll have the foundation to build a more powerful and accurate swing.
Important Safety and Setup Considerations

Before you start working on your wrist hinge, it’s essential to understand the mistakes that sabotage most golfers’ swings. The wrong wrist positioning doesn’t just cost you distance, it sends your ball flying left in a duck hook that’s tough to shake.
The biggest culprit? Excessive lead wrist flexion combined with forearm supination. When your lead wrist bends too much during the follow-through and your forearms roll over each other, you’re closing the clubface dramatically. This snaps the face shut at impact and produces those frustrating hooks that seem impossible to correct.
Think of your lead elbow position as a checkpoint. If it drops below your trail elbow during the swing, you’re inviting supination, that rolling motion that closes the face. The shaft needs to stay to the right of your hands through the follow-through, not flip over the top. When these elements go wrong together, you’re fighting an uphill battle for consistent contact.
Many golfers also struggle with tension, particularly if they’re experimenting with approaches like CBD and golf to stay relaxed on the course. While staying loose helps, the real fix requires understanding the mechanical chain reaction that causes hooks. You can’t muscle your way out of improper wrist mechanics, you need to address the root cause before building the correct technique in the steps ahead.
Step-by-Step Process to Develop Proper Wrist Hinge
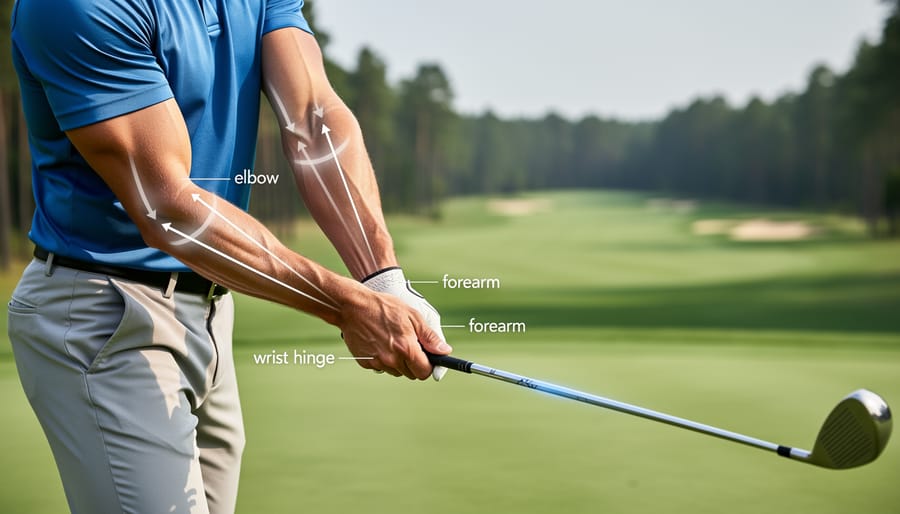
Creating the Initial Hinge
Start by addressing your grip and setup position. Take your normal stance with the club resting behind the ball, then begin your takeaway by moving the club back low and slow. As the shaft reaches parallel to the ground, this is where you’ll create the initial hinge.
Think of your wrists cocking horizontally, not vertically upward. Your lead wrist (left wrist for right-handed golfers) should maintain a relatively flat or slightly bowed position rather than cupping dramatically. Imagine setting the club on a shelf at waist height, with your wrists hinging naturally to support that motion.
By the time your lead arm reaches parallel at the top of your backswing, you should feel a noticeable angle between the club shaft and your forearm. This stored energy is what generates clubhead speed through impact. Whether you’re working on a single plane swing or a traditional two-plane motion, proper wrist hinge remains essential.
The key is timing this hinge to happen naturally during your backswing rotation, not forcing it too early or delaying it until too late. Your wrists should feel firm but not rigid, allowing the weight of the clubhead to help create the angle as momentum builds.
Managing the Follow-Through

Once you’ve established proper hinge in your backswing, the follow-through is where many golfers lose control of the clubface. Stop your swing when the club reaches chest height on your follow-through. At this checkpoint, your clubface should be square to slightly open, not pointing down at the ground. If the face points down, you’ve allowed too much lead wrist flexion, which closes the clubface and sends shots hooking left.
The correction requires deliberate wrist control. From that chest-high position, slowly extend your lead wrist rather than letting it flex forward. This extension keeps the clubface open and counteracts the natural tendency to roll your wrists closed. You should feel your lead wrist moving back toward your forearm rather than folding forward. Once you’ve confirmed the face position, rehinge the club at chest height to complete your follow-through.
Your arm position matters just as much. Throughout this motion, keep your lead elbow higher than your trail elbow. When the trail elbow rises above the lead, your forearm supinates and rotates the clubface closed, creating that same hooking problem. Check that the shaft stays to the right of your hands during follow-through. If the shaft crosses over to the left side of your hands, you’ve released the club too early or rolled your wrists.
Practice this chest-high checkpoint repeatedly until the correct wrist extension and elbow position become automatic. The feeling will seem exaggerated at first, but it builds the muscle memory needed for consistent ball striking.
Maintaining Proper Arm and Elbow Position
Your elbow relationship plays a critical role in maintaining the open clubface position you created through proper wrist hinge. Throughout the entire swing, from takeaway through follow-through, your lead elbow must stay higher than your trail elbow. When the trail elbow rises above the lead, your forearm naturally rotates inward (supinates), which closes the clubface and sends shots left.
Think of it as maintaining a stable frame. As you swing through impact and into your follow-through, resist the temptation to let your trail arm dominate or flip over the lead arm. This flipping motion is what causes the clubface to point downward at chest height instead of staying open to the sky.
The shaft position provides another checkpoint: at chest height in your follow-through, the shaft should remain to the right of your hands (for right-handed golfers). If the shaft crosses over to the left side of your hands, you’ve allowed too much forearm rotation and closed the face. This simple visual reference helps you catch the problem immediately.
Practice half-swings where you consciously monitor this elbow relationship. Stop at chest height and check: lead elbow higher, shaft right of hands, clubface open. This positioning keeps your wrist hinge working correctly instead of fighting against it.
Checking Your Progress and What to Look For
Knowing what correct wrist hinge looks and feels like helps you identify when you’ve got it right. Start by stopping your swing at chest height and checking your clubface position. The face should point slightly upward or neutral, not down at the ground. If it’s pointing down, you’re flexing your lead wrist too much and closing the face, which causes hooks.
Watch your elbow relationship throughout the swing. Your lead elbow should stay higher than your trail elbow from start to finish. When the trail elbow rises above the lead, your forearms supinate and close the clubface. You can film yourself from face-on to verify this checkpoint, or use review games with friends to spot each other’s positions.
Ball flight tells you everything. Proper wrist hinge produces a consistent ball flight that starts on target and either stays straight or curves gently. Persistent hooks mean you’re closing the face through excessive flexion or supination. Weak slices often indicate insufficient hinge or early release.
The shaft position offers another reliable check. During your follow-through, the shaft should remain to the right of your hands (for right-handed golfers). If the shaft crosses over to the left side, you’ve rolled the face closed.
If you’re struggling to self-diagnose these positions, Cornerstone’s teaching staff can quickly identify what’s happening in your swing. A single lesson often clarifies what you can’t see on your own, giving you specific reference points to practice independently.
Common Questions About Wrist Hinge
When should wrist hinge happen in the swing?
Wrist hinge begins naturally during your takeaway and reaches full horizontal cocking by the top of your backswing. The wrists stay hinged through impact and then rehinge again at chest height during your follow-through, there’s no need to force the timing if you maintain proper wrist position throughout.
Why does my ball still hook even when I focus on wrist hinge?
Hooking usually happens when you flex your lead wrist too much or let your forearm rotate (supinate) during the follow-through, which closes the clubface. Try stopping your swing at chest height and checking that the clubface isn’t pointed down, extend your lead wrist slightly to keep it open, and make sure your lead elbow stays higher than your trail elbow throughout the swing.
How do I know if I’m hinging correctly?
At the top of your swing, your wrists should be cocked horizontally rather than cupped or bowed dramatically. During follow-through, the shaft should remain to the right of your hands (for right-handed golfers), and the clubface should point slightly open rather than down toward the ground when you stop at chest height.
Can I practice wrist hinge without going to the course?
Absolutely, you can rehearse the motion at home with just a club. Work through slow-motion swings, stopping at key positions to check your wrist angles and elbow positioning, then gradually build up speed as the movement becomes more natural.
Many golfers struggle with wrist hinge because they confuse horizontal cocking with other wrist movements. The key distinction is that proper hinge happens side-to-side, not up-and-down or in a cupping motion. If you’re working on this skill and still seeing inconsistent results after a few practice sessions, consider booking time with one of Cornerstone’s teaching professionals. They can spot subtle flaws in your mechanics that are difficult to diagnose on your own, and having a trained eye watching your swing can fast-track your progress significantly.
The timeline for developing consistent wrist hinge varies by golfer, but most players start seeing improvements in ball contact and distance within two to three weeks of focused practice. Don’t get discouraged if it feels awkward at first, you’re rewiring movement patterns that may have been ingrained for years. The practice facilities at Cornerstone provide an ideal environment to work on this technique, whether you’re hitting balls on the range or doing slow-motion rehearsals on the chipping green.
Mastering wrist hinge isn’t just for tour professionals or single-digit handicappers. Whether you’re taking your first lesson or fine-tuning mechanics you’ve used for years, proper wrist hinge forms the foundation of consistent ball striking and genuine power generation. The techniques covered here, from creating that initial horizontal cock during takeaway to managing clubface position through follow-through, work for every golfer willing to invest practice time.
Cornerstone Golf Club offers the ideal environment to develop these skills. Our practice facilities give you space to work through each step at your own pace, and our teaching staff can provide personalized feedback when you need a trained eye to spot subtle issues. You might be fighting hooks from excessive lead wrist flexion, or you could simply want to add distance without swinging harder. Either way, the support system here helps you stay accountable and measure real progress.
Start with short swings, checking your positions at chest height. Film yourself from down the line to verify shaft angle and elbow position. As the movements become automatic, you’ll notice straighter shots, better compression, and more confidence standing over every club in your bag.
The community atmosphere at Cornerstone means you’re never working on your game alone. Bring these concepts to the range, ask questions during group clinics, and enjoy the process of genuine improvement surrounded by fellow golfers who share your commitment to better play.